Search This Blog

Friday, March 11, 2016

Denim hair clips

Super simple hair clips!  Just used the belt loops off some old jeans in the recycle pile.  For the bling I used hot fix rhinestones.

Monday, March 07, 2016

Fiesta!!

I got the supplies to do this hair clip last year around Fiesta time and just never got to it...the tiny straw hats were impossible to find for a while!  I was determined to get this one finished in time for Fiesta this April!  I've decided I need to learn how to make miniature crepe paper flowers for another style on the hat...  but in love how this one has come out!!

Monday, February 23, 2015

S' mores cookies!

I was playing around in the kitchen yesterday day and had a box of devils food cake mix (Betty Crocker super moist!) that I had accidentally poked a hole in the bag in my attempt to just get one more box top for my daughter's school, lol.  I had to come up with something to make with it but didn't want cake. 
Here is my recipe!

S'mores Cookies

Preheat oven to 350°

1 box Devil's Food cake mix
2 eggs
1/2 c. applesauce (or veg oil)
1/3 c. Chocolate chips
1/2 c. Marshmallows
3 large (full rectangle) graham crackers, broken up

Mix first 3 ingredients into a batter.  Add dry ingredients and stir well.  Place teaspoonful of batter 2 inches apart on cookie sheet and bake for 10-12 minutes.

Makes about 3 dozen cookies.
You can add more or less of the dry ingredients to suit your tastes :) Just keep in mind that the marshmallows melt and ooze out :)  I used fresh parchment paper under each batch to make cleanup easy and sliding off the hot ones with the paper to cool before removing them from the sheet was way easier!

Saturday, March 02, 2013

Ribbon bow holders!


Can be customized to your liking! Be sure to check out my previous post for bows!


Some of my ribbon sculpture attempts :)

I have really enjoyed learning how to make these critters and such for my Izzy... She has a ton of hair!  I also make them to sell and am working of building up my stock :). If you see one you like just message me (florellis@gmail.com) and I will see what we can do.  Some colors may not be the same but I can generally make them to order!  Pricing depends on size and difficulty of the character, if you find a picture of one you would like me to make, just send it to me and I will do my best.  I have made all of these just from seeing a picture :)
Turkey
Froggie

Christmas tree

Ladybug pair

Cross pair

Pumpkin

Big loop bow, Big Sister ribbon

Dragonfly pair

Big Goldfish

Big loop bow, Stripey ribbon

Giraffe (oh so cute but was a doozy to make!!)

Strawberry pair

 Super looper bows

Six loop bow

Patriotic bows

Sunday, May 27, 2012

Bridal dinner invitation

5x7 card base Bazzill Basics Black Tie
4.5"x6.5" Bazzill Basics Pansy
~4x6 vellum
Cut 3" square and split on diagonal for upper right corner (Recollections glitter cs)
Cut 1.5" square and split for lower left corner


Sunday, December 18, 2011

simple nativity Christmas card

the star is cut from silver glitter paper, blue background is embossed with the 5x7 cuttlebug snowflake folder,  Nativity from the Inspired Heart Cricut cartridge


Thursday, December 01, 2011

for the concert this weekend ...

<p>Izzy needed a shirt for Yo Gabba Gabba!<br>
Plex is on the front...logo on the back


Tuesday, November 08, 2011

princess castle cake

used a castle bundt pan for the basic shape and iced with buttercream


Saturday, July 30, 2011

Stand up cards

Got inspiration from a CardMaker kit for this set and made my own card...


Monday, January 31, 2011

New envelopes, Vinyl and Quilts!

some 'customized' envelopes for gift cards


Master Diver badge vinyl sticker


 Submarine dolphins- two different versions


 Texas flag + home= 'nuff said. :)


 Pillow case I quilted on my machine to match this quilt I made for my MIL:


This is a Turning Twenty Again pattern made with batiks- I LOVE this set of batiks! 
Made this one for my daughter, Isabella.

Sunday, October 31, 2010

Cobra!!!

New Vinyl I made for my hubby's car... 
used my Make the Cut software and Cricut to cut the image and made a white shadow layer to make it stand out...  hubby loves it!

Tuesday, September 14, 2010

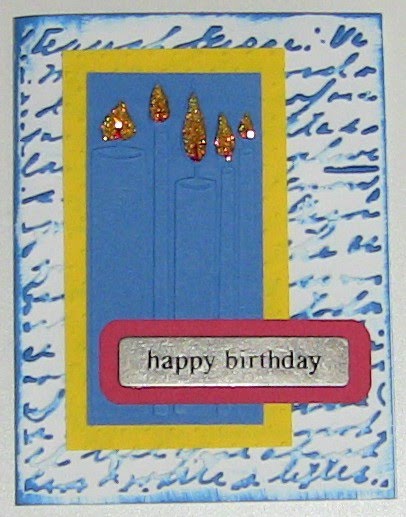
Birthday card for 99 year old

a card I did for a 99 year old... 
I used the Cuttlebug Script texture embossing folder on the background and inked the white cardstock with Staz-on ink in Azure blue.  The yellow paper has Swiss Dots Cuttlebug embossing folder for some added texture.  The candles are the Cuttlebug Birthday Wishes embossing folder.  I used three different colors of Stickles for the candles- Christmas Red, Orange Peel and Yellow.  The metal sentiment is from Joanns.


Monday, August 23, 2010

Submarine vinyl, It's a Boy card and a Quilt!

Just a whole crafty kind of week this week with a few projects to show...

First up are the US Navy Submarine Dolphins that I made for my Dad who is a retired Navy captain...
found the graphic online and just imported it to Make the Cut and cleaned it up a bit.  I think if I cut it again I will work on making it a little more solid- all those scales were a PAIN!

Next up is a baby boy card for a baby shower of a friend...
Love this card for its simplicity.  I used a ready made card from Joann's and embossed it with my Swiss Dots CB folder.  The wording is from a We R Memory Keepers "Foil Glitter Flock" baby boy set- I used the brown flock for the rub on.  There are blue adhesive gems on the circle of words as well.

Last, but not least, is a quilt I made for my best friend with fabrics she sent me from Australia.
It is a small quilt but it is the first one I actually quilted myself on my regular Bernina sewing machine.  It took me forever to do (sorry S!!!) but I am so glad it is done now! :)

Saturday, August 07, 2010

Soldier card and Monogram card with gift card holder...

Soldier card- simple cuts of 2 x 3 1/2" and increasing by 1/4 " for each blue and red layers, then by a 1/2" for the yellow.  A2 size- used a ready made white cardstock card for the base.


Cursive 101 cartridge for the letters and Ashlyn's Alphabet frame (Icon: J), yellow Stickles on the frame and Diamond Glaze on the top letter layers.  First time I had used the Diamond Glaze- I think I like the shine and smoothness it gives...just a pain to get the air bubbles out!  Not so sure about the frame and it's asymmetry- I like my symmetry, dang it!  But I decided to let the bit of whimsy stay there... 
This was a fairly large card for me- nearly 5 x 7.


Just a little gift card holder to go in the above card.